前回の続き。今回は Istio を導入してみる。
クラスタの作成
Control Plane 1台、Worker Node 2台のクラスタを作成する。
$ cat cluster.yaml
# three node (two workers) cluster
kind: Cluster
apiVersion: kind.x-k8s.io/v1alpha4
nodes:
- role: control-plane
- role: worker
- role: worker
$ kind create cluster --config cluster.yaml
MetalLB のインストール
なくても Istio は使えるのですが、MetalLB で type: LoadBalancer なサービスも作成されるので使えるようにしておく。
Kubernetes in docker (kind) on Mac に MetalLB 入れて type:LoadBalancer もマルチノードもお手軽に遊ぶを参考にさせてもらいました。
$ kubectl apply \
-f https://raw.githubusercontent.com/danderson/metallb/v0.8.3/manifests/metallb.yaml
namespace/metallb-system created
podsecuritypolicy.policy/speaker created
serviceaccount/controller created
serviceaccount/speaker created
clusterrole.rbac.authorization.k8s.io/metallb-system:controller created
clusterrole.rbac.authorization.k8s.io/metallb-system:speaker created
role.rbac.authorization.k8s.io/config-watcher created
clusterrolebinding.rbac.authorization.k8s.io/metallb-system:controller created
clusterrolebinding.rbac.authorization.k8s.io/metallb-system:speaker created
rolebinding.rbac.authorization.k8s.io/config-watcher created
daemonset.apps/speaker created
deployment.apps/controller created
$ kubectl get ns
NAME              STATUS   AGE
default           Active   5m8s
kube-node-lease   Active   5m9s
kube-public       Active   5m9s
kube-system       Active   5m9s
metallb-system    Active   9s
Pod を確認してみる。controller は Deployment で、speaker は DaemonSet で作成されている。
$ kubectl get pods -n metallb-system
NAME                          READY   STATUS    RESTARTS   AGE
controller-65895b47d4-zsw5d   1/1     Running   0          37s
speaker-cd8rm                 1/1     Running   0          37s
speaker-kbn97                 1/1     Running   0          37s
speaker-w24jv                 1/1     Running   0          37s
L2 モード用の ConfigMap を作成する。IPアドレスのレンジは自分の環境で被ってなければ何でも良い。
$ kubectl apply -f - << 'EOF'
apiVersion: v1
kind: ConfigMap
metadata:
  namespace: metallb-system
  name: config
data:
  config: |
    address-pools:
    - name: default
      protocol: layer2
      addresses:
      - 192.168.100.2-192.168.100.254
EOF
参考にした Qiita のページにあるようにサービスを作って試してみると良い。
Istio のセットアップ
Customizable Install with Istioctl を見ながら istioctl コマンドでインストールします。
curl -L https://istio.io/downloadIstio | sh -
と実行するとカレントディレクトリに istio-1.4.2 ディレクトリができて tar.gz が展開されています。この中の bin/istioctl を使います。インストール後に使い道があるのかどうかよく分からないのでとりあえず、ここに置いたまま進めます。
Istio には多くのコンポーネントがあり、profile という形でセットになっています。
$ istio-1.4.2/bin/istioctl profile list
Istio configuration profiles:
    default
    demo
    minimal
    remote
    sds
今回は見栄えのする Kiali を使うために demo profile でインストールします。
$ istio-1.4.2/bin/istioctl manifest apply --set profile=demo
Preparing manifests for these components:
- Telemetry
- Injector
- PrometheusOperator
- EgressGateway
- Cni
- Citadel
- Pilot
- Policy
- Kiali
- CoreDNS
- Tracing
- Grafana
- NodeAgent
- Prometheus
- IngressGateway
- Galley
- CertManager
- Base

Applying manifest for component Base
Finished applying manifest for component Base
Applying manifest for component Tracing
Applying manifest for component Policy
Applying manifest for component EgressGateway
Applying manifest for component Kiali
Applying manifest for component Citadel
Applying manifest for component Galley
Applying manifest for component IngressGateway
Applying manifest for component Prometheus
Applying manifest for component Pilot
Applying manifest for component Injector
Applying manifest for component Telemetry
Applying manifest for component Grafana
Finished applying manifest for component Kiali
Finished applying manifest for component Prometheus
Finished applying manifest for component Citadel
Finished applying manifest for component Tracing
Finished applying manifest for component Galley
Finished applying manifest for component Injector
Finished applying manifest for component EgressGateway
Finished applying manifest for component IngressGateway
Finished applying manifest for component Policy
Finished applying manifest for component Pilot
Finished applying manifest for component Grafana
Finished applying manifest for component Telemetry

Component NodeAgent installed successfully:
===========================================

Component Kiali installed successfully:
=======================================

Component CoreDNS installed successfully:
=========================================

Component Tracing installed successfully:
=========================================

Component Grafana installed successfully:
=========================================

Component Base installed successfully:
======================================

Component Prometheus installed successfully:
============================================

Component IngressGateway installed successfully:
================================================

Component Galley installed successfully:
========================================

Component CertManager installed successfully:
=============================================

Component Telemetry installed successfully:
===========================================

Component Injector installed successfully:
==========================================

Component PrometheusOperator installed successfully:
====================================================

Component Policy installed successfully:
========================================

Component EgressGateway installed successfully:
===============================================

Component Cni installed successfully:
=====================================

Component Citadel installed successfully:
=========================================

Component Pilot installed successfully:
=======================================
istio-system という namespace が追加されました。
$ kubectl get ns
NAME              STATUS   AGE
default           Active   25m
istio-system      Active   59s
kube-node-lease   Active   25m
kube-public       Active   25m
kube-system       Active   25m
metallb-system    Active   20m
サービスの確認。istio-ingressgateway は LoadBalaner ですが MetalLB のおかげで EXTERNAL-IP がセットされています。
$ kubectl get svc -n istio-system
NAME                     TYPE           CLUSTER-IP       EXTERNAL-IP     PORT(S)                                                                                                                      AGE
grafana                  ClusterIP      10.97.73.72      3000/TCP                                                                                                                     2m38s
istio-citadel            ClusterIP      10.102.98.80     8060/TCP,15014/TCP                                                                                                           2m41s
istio-egressgateway      ClusterIP      10.106.154.29    80/TCP,443/TCP,15443/TCP                                                                                                     2m38s
istio-galley             ClusterIP      10.101.223.137   443/TCP,15014/TCP,9901/TCP,15019/TCP                                                                                         2m40s
istio-ingressgateway     LoadBalancer   10.106.135.139   192.168.100.2   15020:32290/TCP,80:30252/TCP,443:32462/TCP,15029:30985/TCP,15030:32647/TCP,15031:30814/TCP,15032:30392/TCP,15443:31688/TCP   2m38s
istio-pilot              ClusterIP      10.103.79.179    15010/TCP,15011/TCP,8080/TCP,15014/TCP                                                                                       2m38s
istio-policy             ClusterIP      10.101.34.3      9091/TCP,15004/TCP,15014/TCP                                                                                                 2m38s
istio-sidecar-injector   ClusterIP      10.104.69.225    443/TCP                                                                                                                      2m40s
istio-telemetry          ClusterIP      10.105.96.88     9091/TCP,15004/TCP,15014/TCP,42422/TCP                                                                                       2m37s
jaeger-agent             ClusterIP      None             5775/UDP,6831/UDP,6832/UDP                                                                                                   2m42s
jaeger-collector         ClusterIP      10.101.71.42     14267/TCP,14268/TCP,14250/TCP                                                                                                2m42s
jaeger-query             ClusterIP      10.110.22.1      16686/TCP                                                                                                                    2m42s
kiali                    ClusterIP      10.109.39.104    20001/TCP                                                                                                                    2m41s
prometheus               ClusterIP      10.105.127.123   9090/TCP                                                                                                                     2m41s
tracing                  ClusterIP      10.103.102.176   80/TCP                                                                                                                       2m42s
zipkin                   ClusterIP      10.110.0.16      9411/TCP                                                                                                                     2m41s
Istio が自動でサイドカー設定を差し込んでくれるように namespace に label を設定します。まずは、default namespace をそのまま使っても良いのですが、テスト用の namespace を作ってそこに設定してみます。あとで bookinfo アプリをデプロイするので名前を bookinfo としておく。
$ kubectl create namespace bookinfo
namespace/bookinfo created

$ kubectl label namespace bookinfo istio-injection=enabled
namespace/bookinfo labeled
Bookinfo アプリのデプロイ
$ kubectl apply -n bookinfo \
    -f https://raw.githubusercontent.com/istio/istio/release-1.4/samples/bookinfo/platform/kube/bookinfo.yaml
service/details created
serviceaccount/bookinfo-details created
deployment.apps/details-v1 created
service/ratings created
serviceaccount/bookinfo-ratings created
deployment.apps/ratings-v1 created
service/reviews created
serviceaccount/bookinfo-reviews created
deployment.apps/reviews-v1 created
deployment.apps/reviews-v2 created
deployment.apps/reviews-v3 created
service/productpage created
serviceaccount/bookinfo-productpage created
deployment.apps/productpage-v1 created

$ kubectl get svc -n bookinfo
NAME          TYPE        CLUSTER-IP       EXTERNAL-IP   PORT(S)    AGE
details       ClusterIP   10.103.184.201   9080/TCP   13s
productpage   ClusterIP   10.96.161.43     9080/TCP   11s
ratings       ClusterIP   10.104.176.147   9080/TCP   12s
reviews       ClusterIP   10.99.9.14       9080/TCP   12s
$ kubectl apply -n bookinfo \
    -f https://raw.githubusercontent.com/istio/istio/release-1.4/samples/bookinfo/networking/bookinfo-gateway.yaml
gateway.networking.istio.io/bookinfo-gateway created
virtualservice.networking.istio.io/bookinfo created

$ kubectl get gateway -n bookinfo
NAME               AGE
bookinfo-gateway   22s
これで istio-ingressgateway にアクセスすれば bookinfo アプリにルーティングされるようになっている。次のように port forwarding して localhost:8080 にアクセスすると bookinfo アプリのページが表示される。
kubectl -n istio-system port-forward svc/istio-ingressgateway 8080:80
Kiali で可視化
同様に kiali に対しても port forwarding してアクセスする。
kubectl -n istio-system port-forward svc/kiali 20001:20001
今度は localhost:20001 にアクセスする。ログイン用のID、パスワードは kubernetes の Secrets に入っているのでのぞけばわかるが、 admin / admin となっていた。
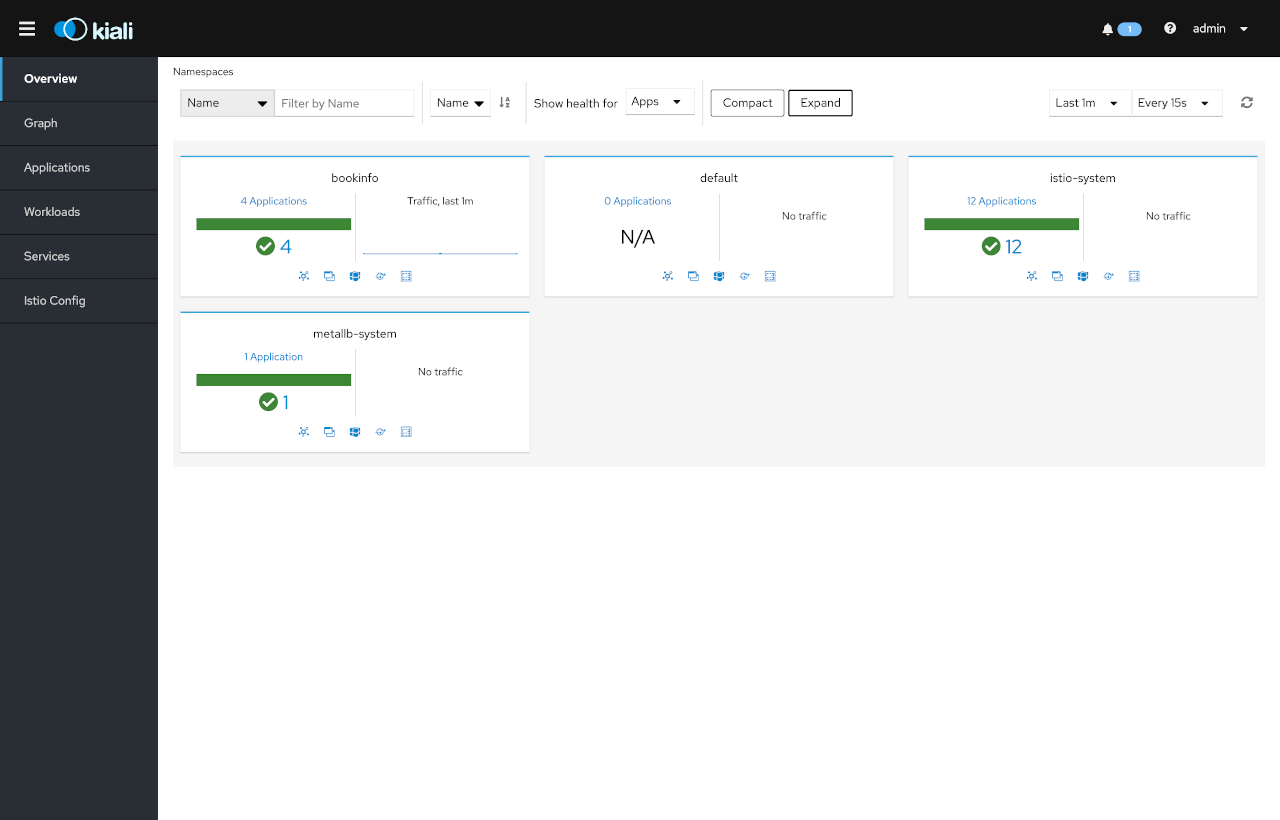
ブラウザで Kiali にアクセスしてログインすると Overview で次のような表示となる。
curl で productpage に何度もアクセスしながら kiali の Graph ページを見ると次のような表示を確認することができる。カッケー!
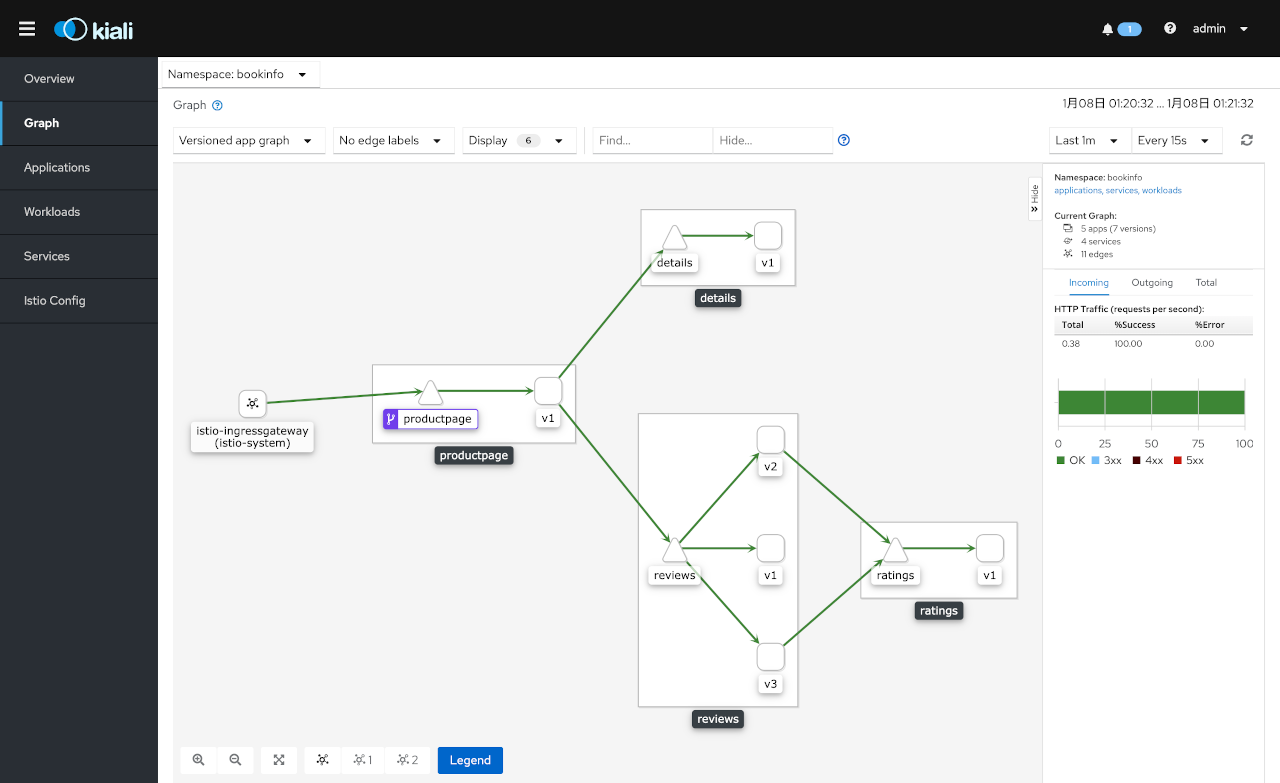
Bookinfo は次のようなサービスで構成されており
kubectl get svc -n bookinfo
NAME          TYPE        CLUSTER-IP       EXTERNAL-IP   PORT(S)    AGE
details       ClusterIP   10.103.184.201   9080/TCP   28m
productpage   ClusterIP   10.96.161.43     9080/TCP   28m
ratings       ClusterIP   10.104.176.147   9080/TCP   28m
reviews       ClusterIP   10.99.9.14       9080/TCP   28m
reviews には3つのバージョンが混在しているため、上のグラフの用に reviews のところから3つに矢印がのびていた。そして、v2, v3 は ratings サービスにアクセスして星の数を表示するが v1 はアクセスしない。v2 と v3 の違いは星の色。
$ kubectl get deployment -n bookinfo
NAME             READY   UP-TO-DATE   AVAILABLE   AGE
details-v1       1/1     1            1           28m
productpage-v1   1/1     1            1           28m
ratings-v1       1/1     1            1           28m
reviews-v1       1/1     1            1           28m
reviews-v2       1/1     1            1           28m
reviews-v3       1/1     1            1           28m
各矢印のところに Requests per second や Requests percentage, Response time を表示させることも可能でした。
以上、Istio を入れて Kiali で可視化するまででした。トラフィックの制御という大事な部分はまだこれから。
お掃除
$ kind delete cluster